WPF App with VC# and XAML in Visual Studio 2017
How to build a WPF application with VC# and XAML in Visual Studio 2017?
✍: FYIcenter.com
![]() If you want to build a WPF (Windows Presentation Foundation) application with VC# and XAML in Visual Studio 2017,
you can follow this tutorial
If you want to build a WPF (Windows Presentation Foundation) application with VC# and XAML in Visual Studio 2017,
you can follow this tutorial
1. Start Visual Studio 2017 with .NET development environment.
2. Click "File > New > Project" menu. You see the new project box showing up.
3. Select "WPF App (.NET Framework) as the project type under "Other Languages > Visual C#" section,
4. Enter the following project name and location:
Name: HelloWpfVcs
Location: c:\fyicenter\vcs2017\
Solution name: HelloWpfVcs
5. Click "OK". You see a default application window displayed on the visual design section showing up.
6. Drag the bottom right corner to change the size of the application window.
7. You also see XAML (Extensible Application Markup Language) definition of the blank application in the XAML section.
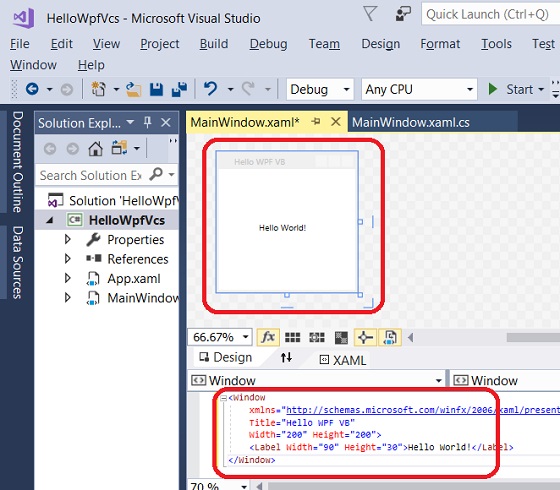
8. Modify the XAML definition with the following:
<Window
    xmlns="http://schemas.microsoft.com/winfx/2006/xaml/presentation"
    Title="Hello WPF VB"
    Width="200" Height="200">
  <Label Width="90" Height="30">Hello World!</Label>
</Window>
9. You see the application window changed in the visual design section.
The picture below shows you how to build a WPF application with VC# and XAML in Visual Studio 2017:
⇒ WPF App with VC# Code in Visual Studio 2017
⇐ Create Visual C# Project in Visual Studio 2017
2017-08-13, ∼3955🔥, 0💬
Related Topics: